Lap time measurement : Y-TRAC Rev
Revs Your Heart – Explore the world of Yamaha motorcycles

helping you achieve even better lap times.
How Lap Times are Measured
Creating a Timed Track

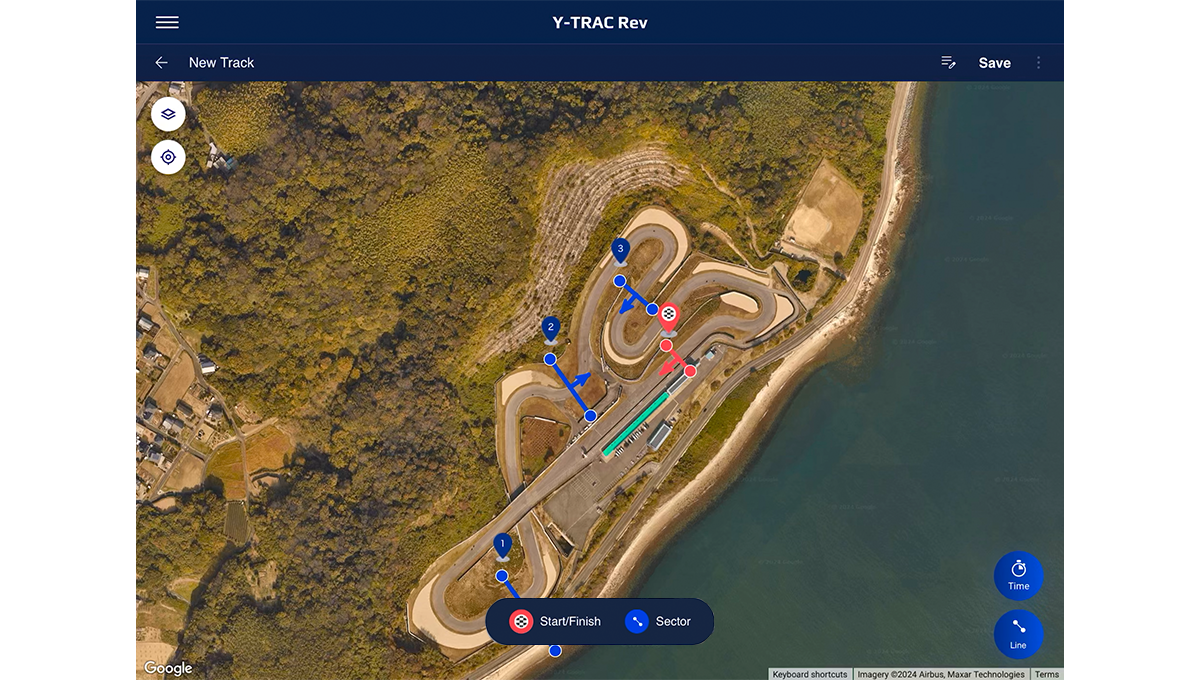
You can select the track type to measure lap and sector times and set custom lines on the track, for track configurations tailored to the rider's goals
Selecting the Track Type
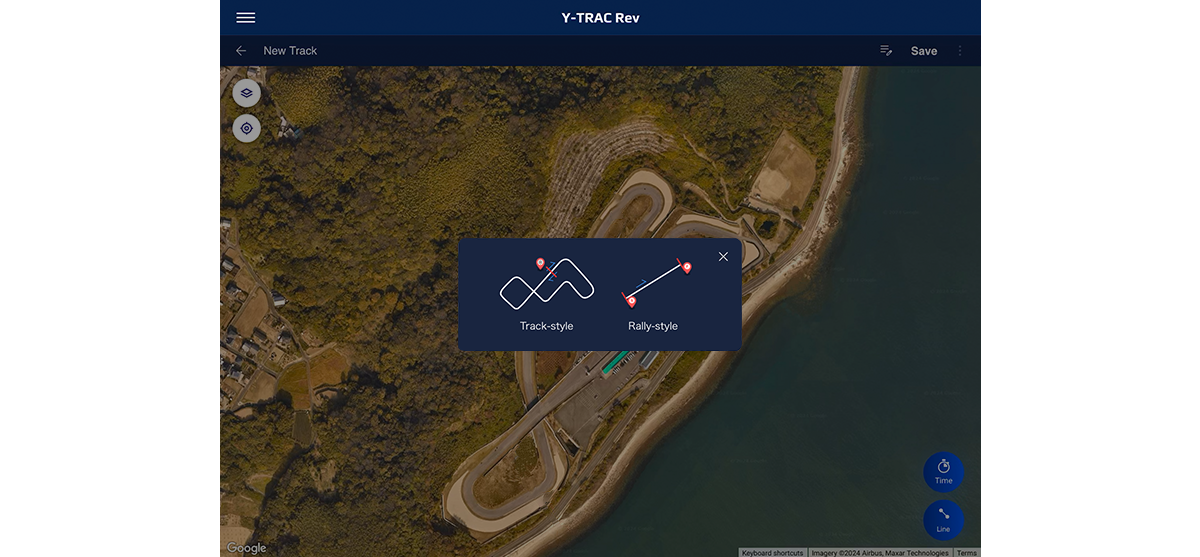
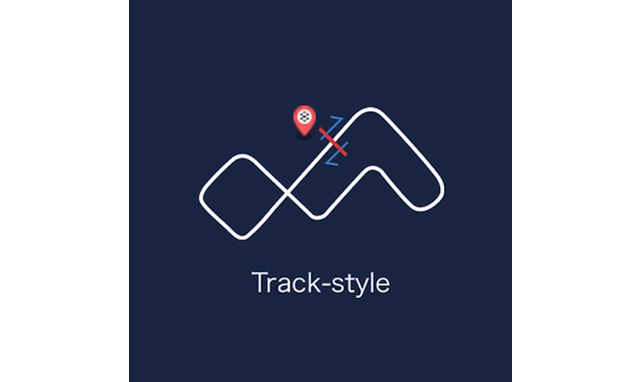
1. Track
For rides on courses, such as circuits, where the start / finish lines are in the same location.

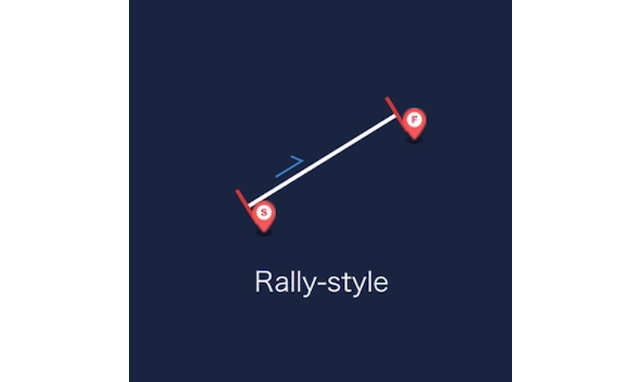
2. Rally
For rides on point-to-point courses, such as rallies, where the start / finish lines are in different locations.

Setting Lines
1. Track
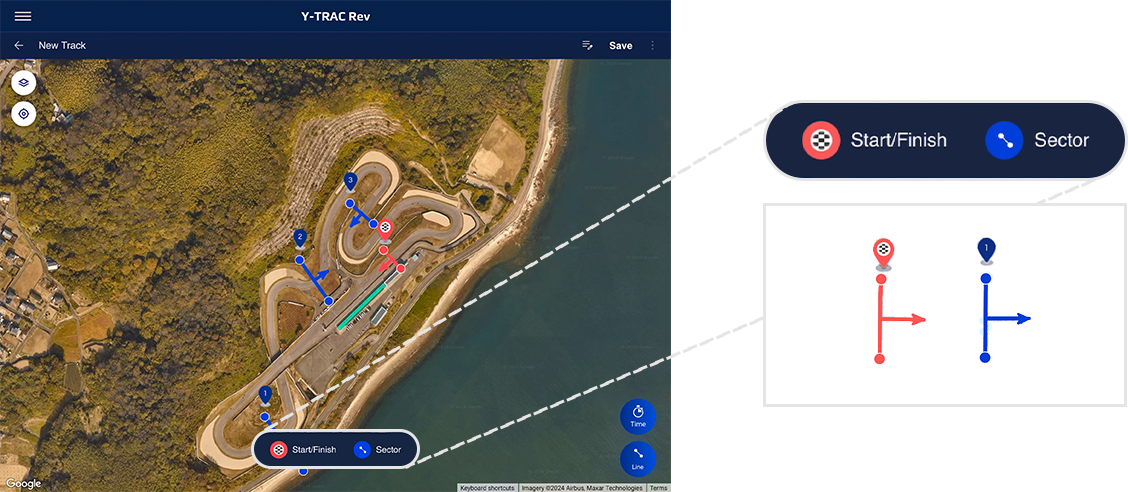
You can set a start / finish line and sector lines on the map.
2. Rally
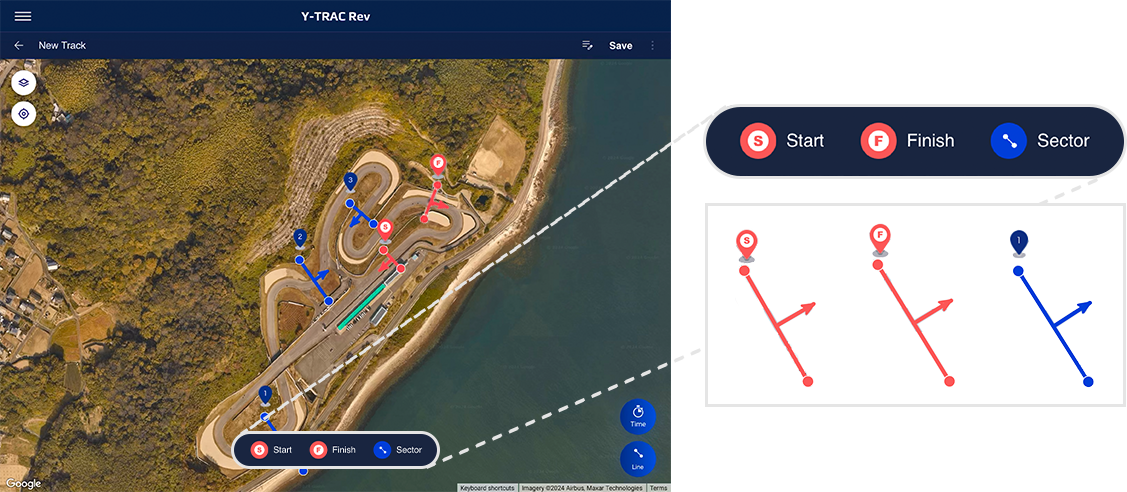
You can set start, finish, and sector lines on the map.

You can set the marker display position, line width, and passing direction by tapping each marker and using flick or pinch gestures.
Setting the Target Time
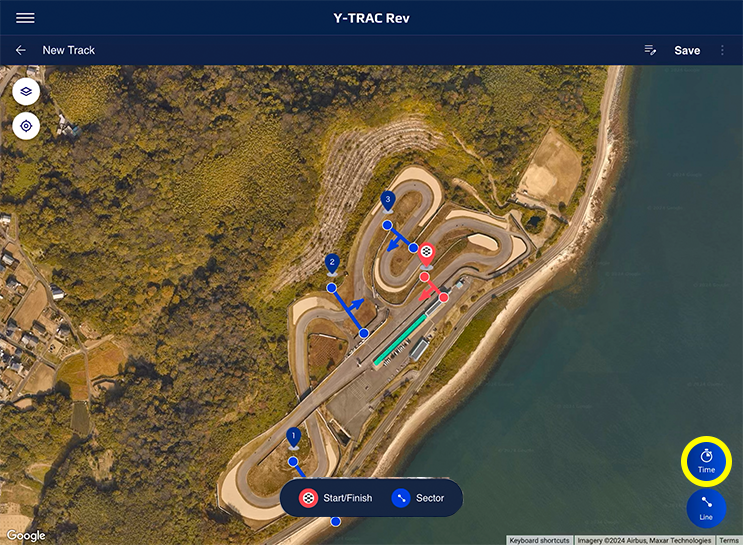
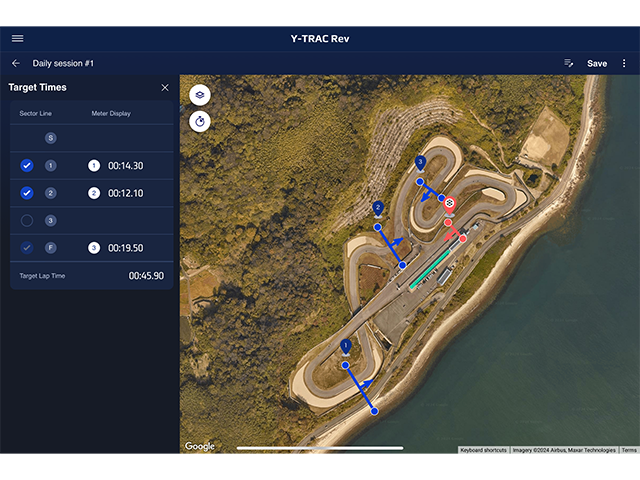
Press the Time button to set Target Times.
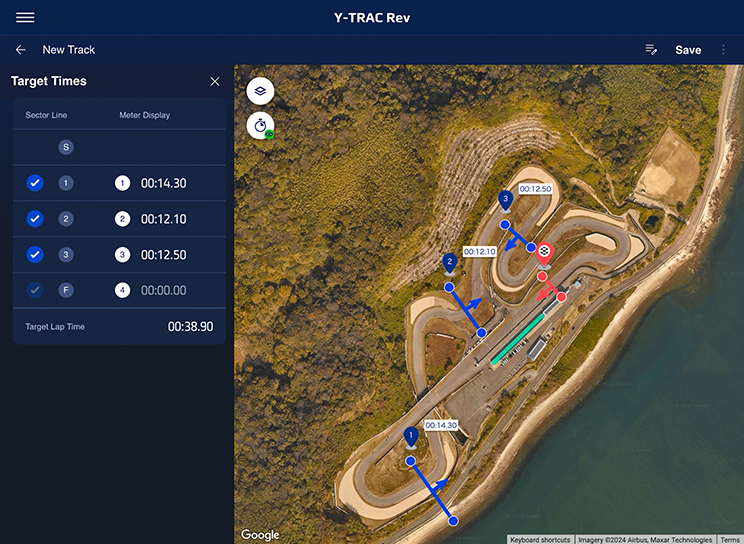
Up to 4 sectors can be set to be displayed on the meter.
Target Time Settings
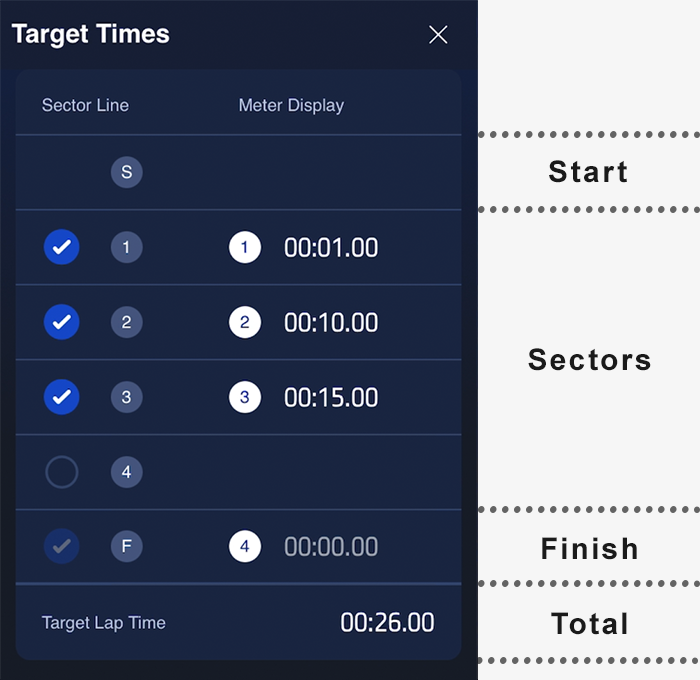
Press the check icon on the left to activate a sector, where you will need to set the target time.
Target Time Notes
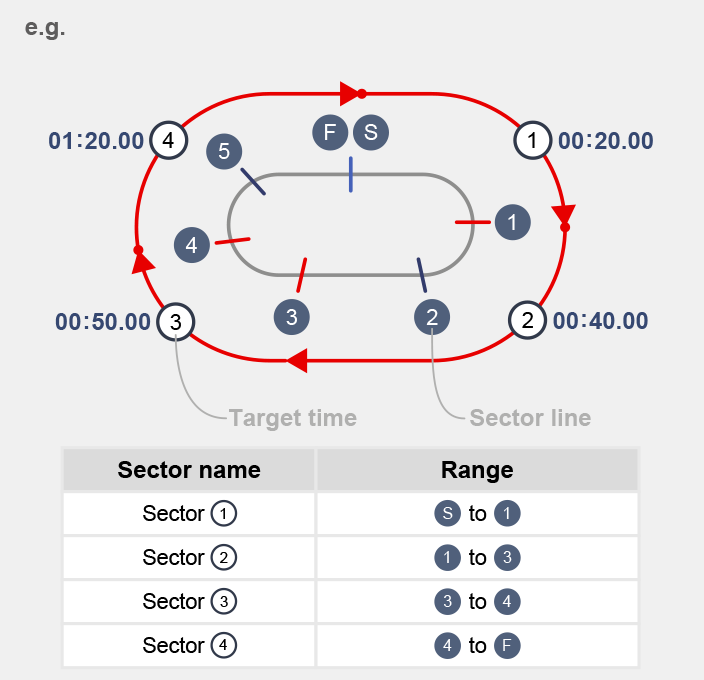
Split a line to create sectors. If you create one or more sectors, you will need to include a sector for the final lap.
Track Settings
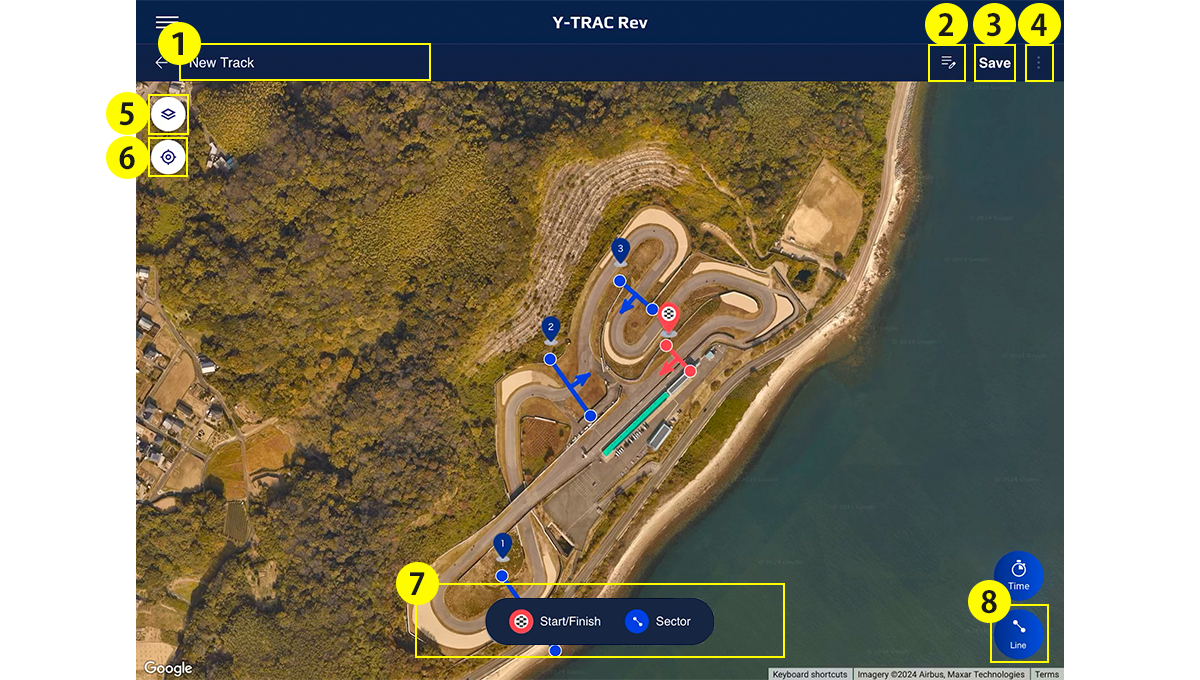
| 1 | Track Name | Displays the track name. |
|---|---|---|
| 2 | Track Overview | Tap to display the track overview window. |
| 3 | Save | Tap to save the displayed track information. |
| 4 | Track Options | Tap to display the track-related options. |
| 5 | Switch Maps |
Opens a menu to change the map type based on your selection. Map types: Default, Satellite, Terrain |
| 6 | Current Location | Change the map to display your current coordinates. The device’s current location will be shown in real time. |
| 7 | Line Types | Displays the available line types and adds a line at the center of the map when a line type is selected. |
| 8 | Line Type Selector | Displays / hides the line type menu. |
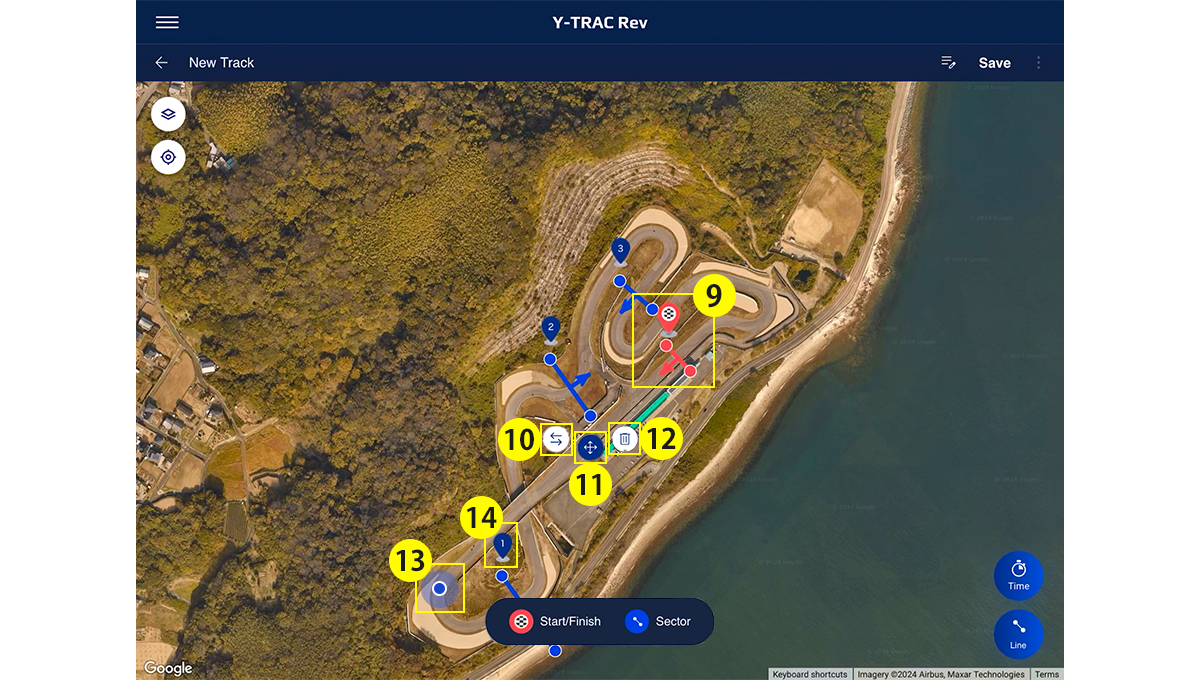
| 9 | Line | Displays images on the map for each line based on their coordinate axis and the direction of travel. An icon is shown beside each line showing the line type (start/finish, start, finish, or sector number). |
|---|---|---|
| 10 | Switch Directions | Tap to toggle the direction of travel. |
| 11 | Reposition Lines | You can drag the selected line to move it. |
| 12 | Delete Lines | Delete the selected line. |
| 13 | Current Location | Displays an icon showing the rider’s current location on the map. |
| 14 | Line Number | Tap to activate edit mode for the selected line and display various line-editing controls. |
Check Track Information
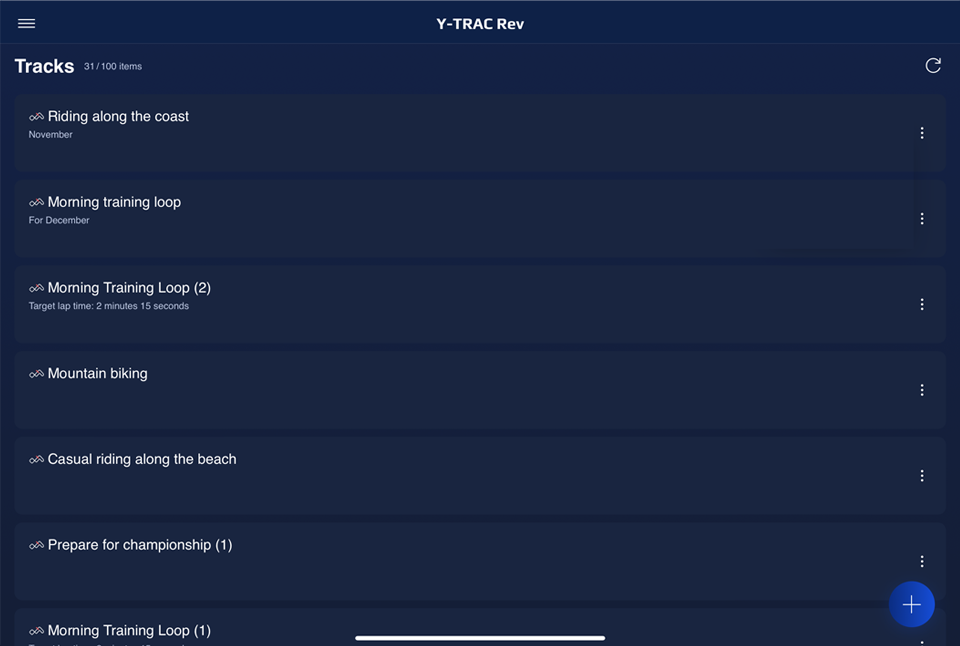
When you have registered tracks
When no tracks are registered
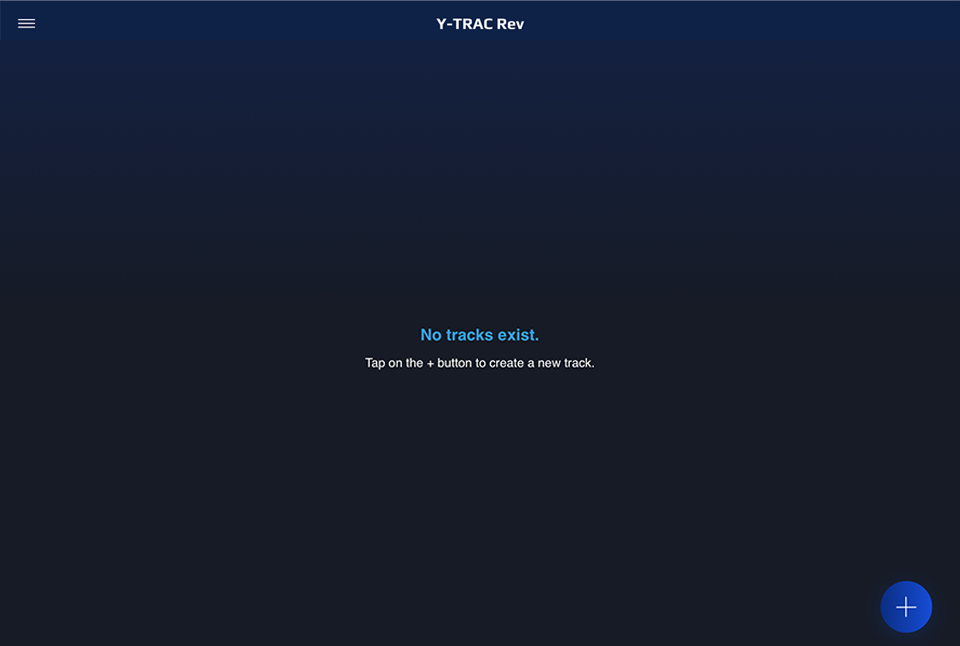
Users can see a list of their own tracks as well as shared tracks. If no tracks exist, tap "+" to create a new one.
Track List
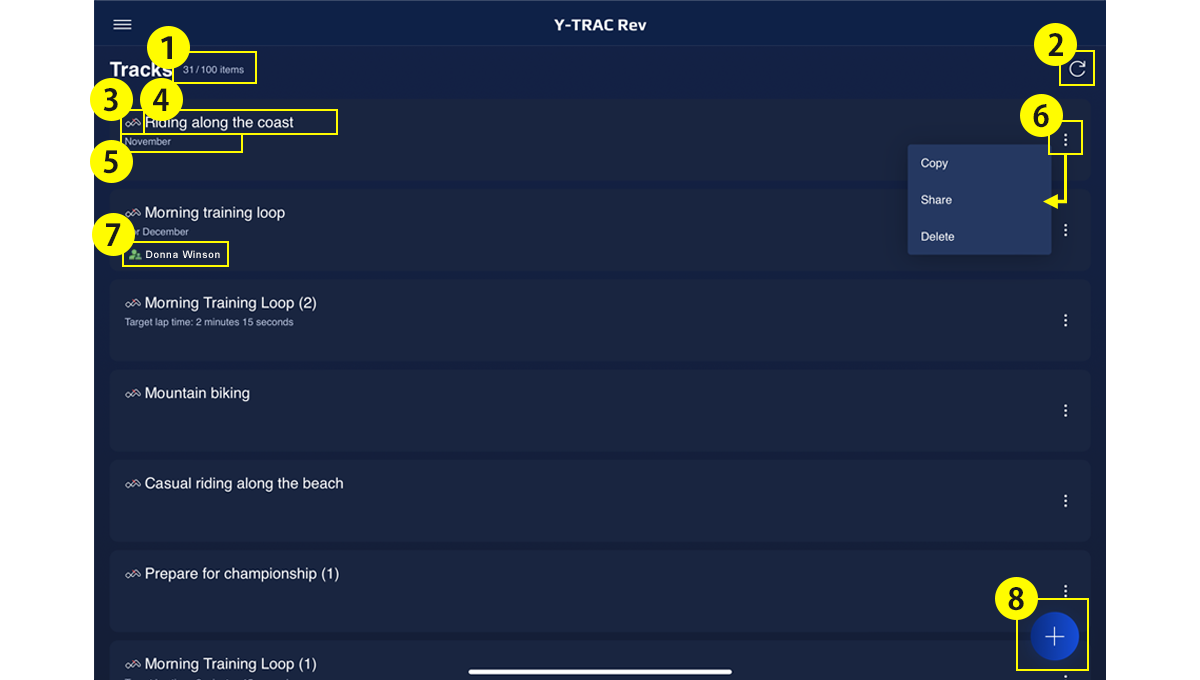
| 1 | Number of Tracks Registered | Displays the number of registered tracks. Up to 100 tracks can be registered. |
|---|---|---|
| 2 | Refresh Tracks | Refresh the timed track details, including changes on Y-TRAC Rev. |
| 3 | Track Type Icon | Displays the icon for the related track type (track or rally). |
| 4 | Track Name | Displays the track name. |
| 5 | Notes | Displays the track description. |
| 6 | Side Menu | Tap to open the menu. You can choose to share, copy, or delete a track. |
| 7 | Original User's Nickname | Displays the nickname of the user who shared the track. |
| 8 | Create Track Button | Opens the track confirmation / edit screen to create a new track. |
Track Details
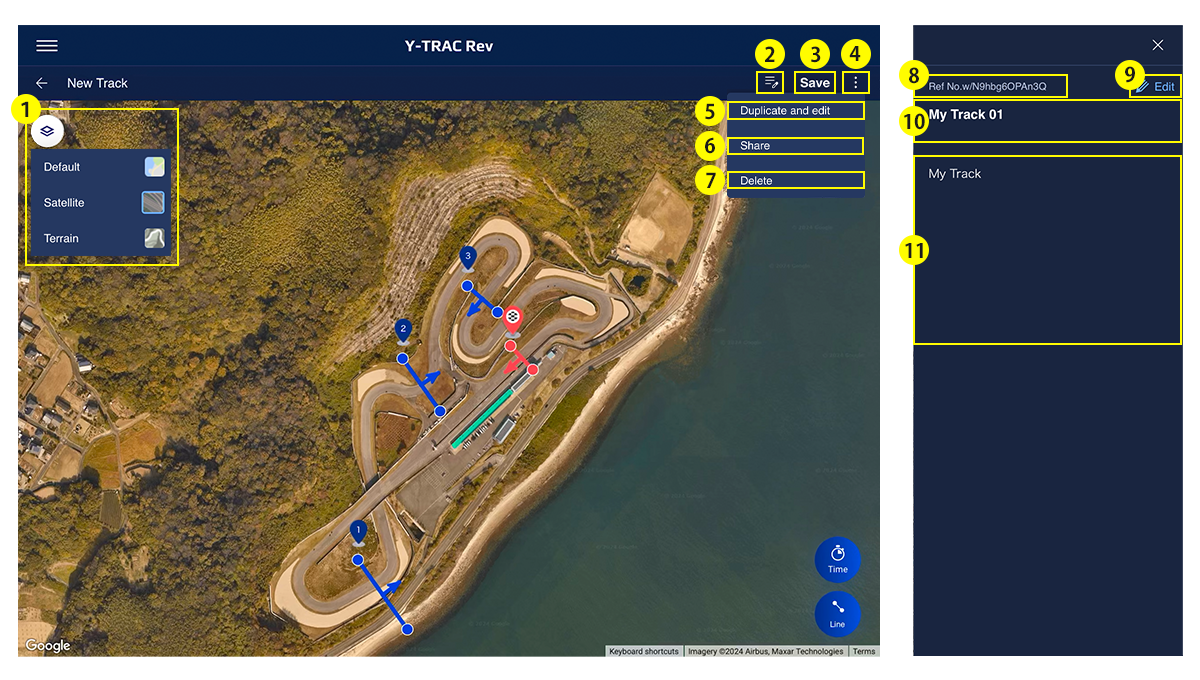
| 1 | Switch Maps |
Opens a menu to change the map type based on your selection. Map types: Default, Satellite, Terrain |
|---|---|---|
| 2 | Track Overview | Tap to display the track-related options. |
| 3 | Save | Tap to save the displayed track information. |
| 4 | Track Options | Tap to display the track-related options. |
| 5 | Duplicate and Edit | Display the duplicated track information on the screen. |
| 6 | Share | Displays the track sharing details at the bottom of the screen. |
| 7 | Delete | Delete the displayed track and close the screen. |
| 8 | Ref No | Calculates and displays the reference number based on the preset line information. |
| 9 | Edit | Opens the screen to edit the track name and notes. |
| 10 | Track Name | Displays the track name. |
| 11 | Note | Displays the track overview notes window by default. |
Edit Track Information
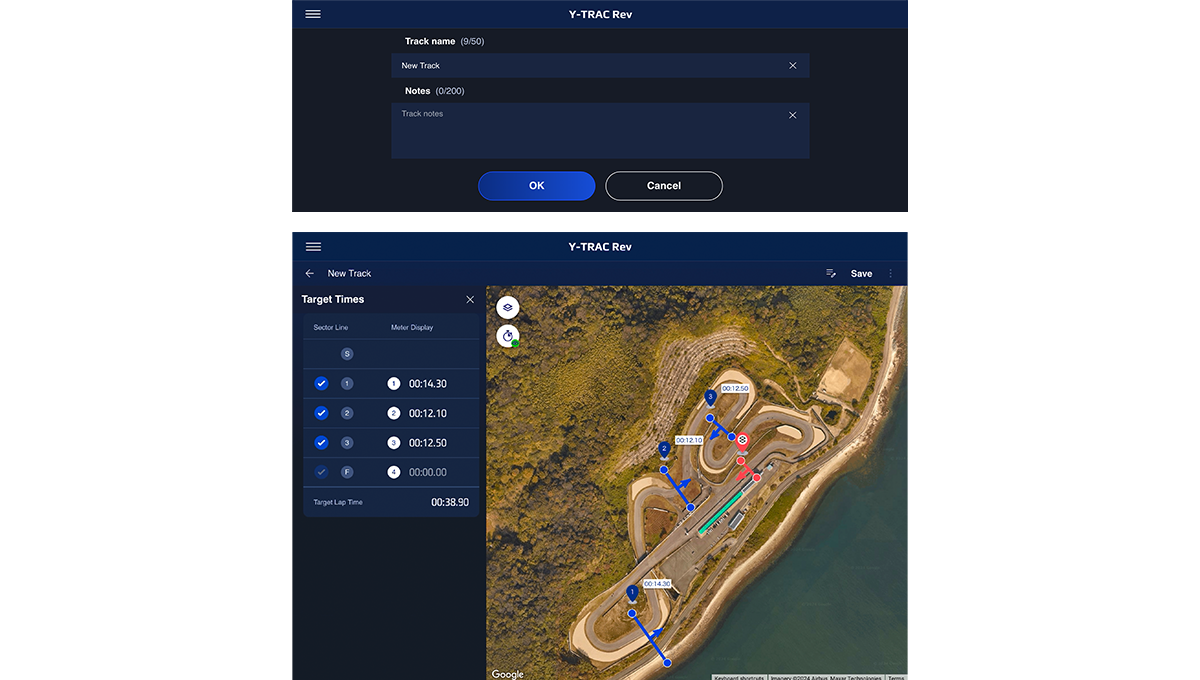
Users can edit the title, notes, sector / finish lines, and direction of travel. Target times for each sector and the total time can also be edited / set. However, for shared tracks, only the target time can be edited, and such edits will not be synced with the original track.
Copy, Share, and Delete Tracks

Users can copy, share, and delete their own tracks and shared tracks. Duplicated tracks will be added to the track list.

Copy, share, or delete tracks from the kebab menu on the track list screen or the track editing screen.
Share Track Information


You can share tracks that you created with contacts of your choice by generating and sharing time-sensitive QR codes and links.
*Some iOS apps (such as X and Gmail) have limitations on how they handle links, which can prevent shared links from opening properly.
*The QR code is valid for 24 hours from the time of issuance.
Track Information Sharing
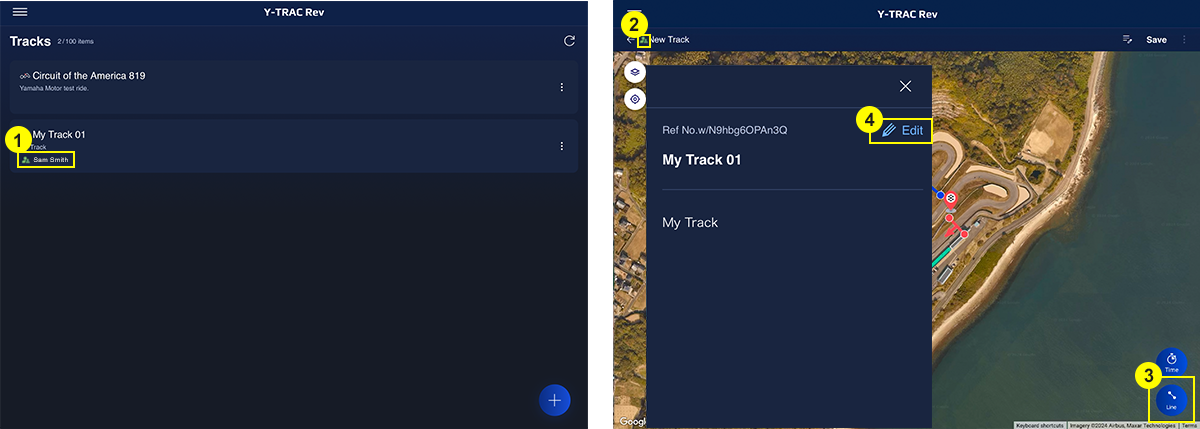
| 1 | Original User's Nickname | Displays the nickname of the user who shared the track. |
|---|---|---|
| 2 | Shared Track Icon | Displays an icon to show that the track is a shared track. |
| 3 | Edit Lines | Press this button to edit the lines. |
| 4 | Track Overview Edit Button | Press this button to edit the track name and notes. |
Y-Connect Timed Track Settings


Y-Connect Settings
You can configure track settings to suit your riding purpose, including selecting track types for lap and sector time measurement and customizing lines on the track.
*You need to be logged in on both apps using the same Yamaha Motor ID or the updates won’t be reflected.
Home screen
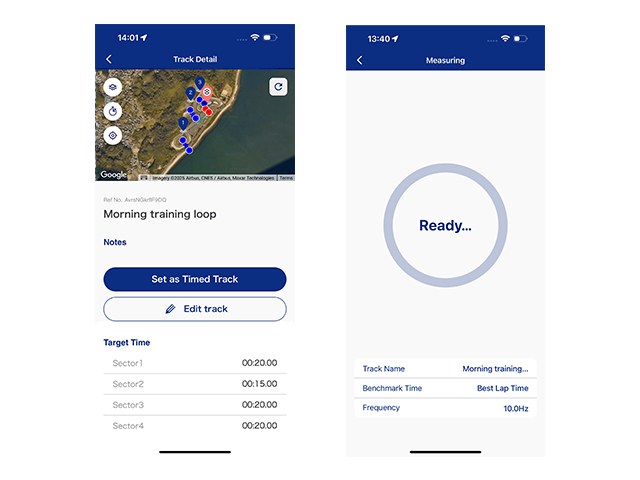
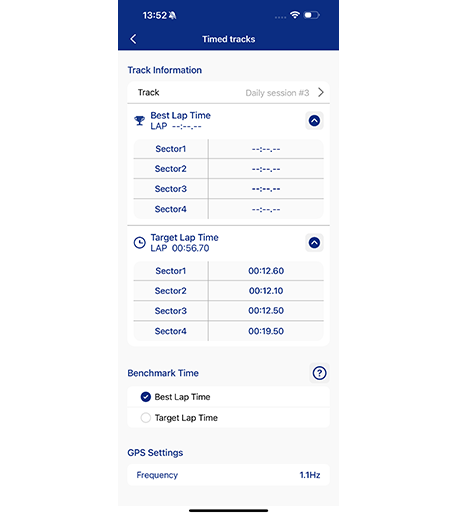
Track details screen for time measurement
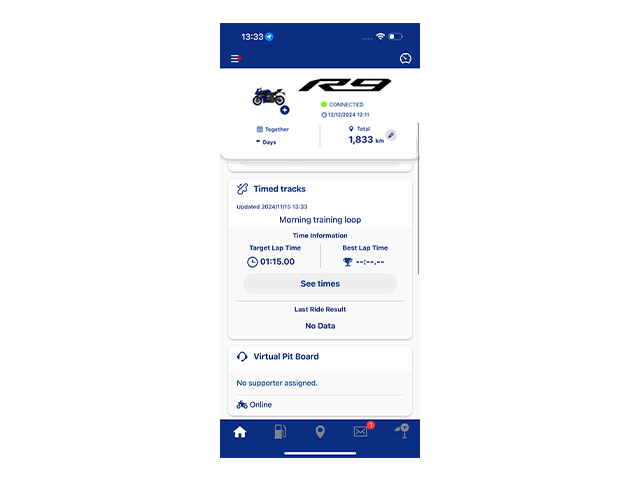
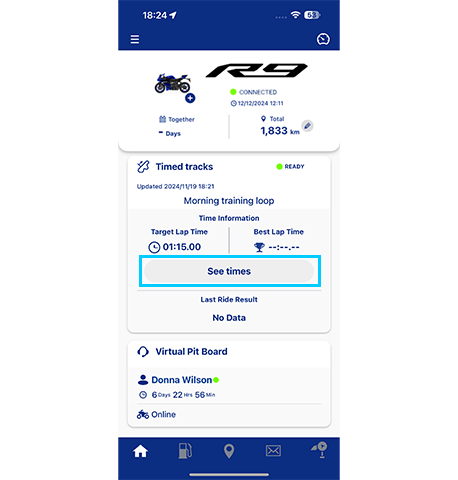
Y-Connect Home Screen
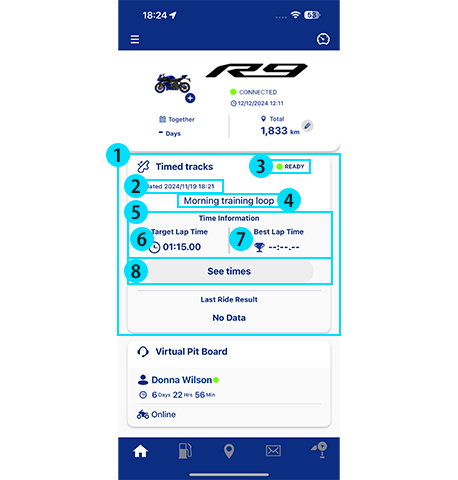
| 1 | Timed track | Card display of information related to the LAP time measurement function as one of the card UIs on the home screen. |
|---|---|---|
| 2 | Updated-date indication | Displays the date and time when the timed track was downloaded to Y-Connect. |
| 3 | Measurement status display | Display the status of the LAP time measurement (Ready/Measuring). |
| 4 | Track name for time measurement | Displays the track name of the time measurement track pre-set by the user. No data available" is displayed if there is no pre-set time measurement track and no time measurement track can be obtained. |
| 5 | Time Information | Area displaying the best LAP time and target LAP time associated with the track designated as the track for time measurement. |
| 6 | Target LAP time | Display of pre-defined target LAP times associated with the track designated for time measurement. |
| 7 | Best LAP time | The best LAP time associated with the track designated for time measurement is displayed. If the best lap time is updated during the run, this value is also updated. |
| 8 | Watch the time | Transition to the track details screen for time measurement. |
Track details screen for measurement
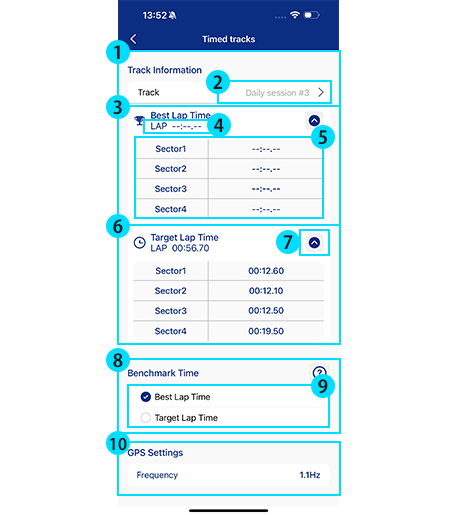
| 1 | Track name for time measurement | Displays the track names of the user's pre-defined timed tracks. |
|---|---|---|
| 2 | Track changes for time measurement | Change the track for time measurement. After tapping the button, the display switches to the track list screen. |
| 3 | Best Time | Displays information on the best lap time and the best sector-to-sector time for the track specified for time measurement. |
| 4 | Best lap time | Display the best LAP time associated with the track designated for time measurement. |
| 5 | Best sector-to-sector time | Displays the best sector-to-sector time associated with the track designated as the track for time measurement. Displayed/hidden by tapping the pull-down. |
| 6 | Target Time | Displays information on the target time and the time between target sectors associated with the track designated as the track for time measurement. |
| 7 | intersector time display | Show/hide the information on the time between each sector specified on the time measurement track by tapping the pull-down. |
| 8 | Display Settings | Area for setting the LAP time to be displayed on the meter and the reference time for displaying the difference between sector times. |
| 9 | Display Settings | Select the LAP time to be displayed on the meter and the reference time for displaying the difference between sector times. |
| 10 | GPS Frequency | Displays the GPS frequency used for GPS logging of LAP time measurements. |
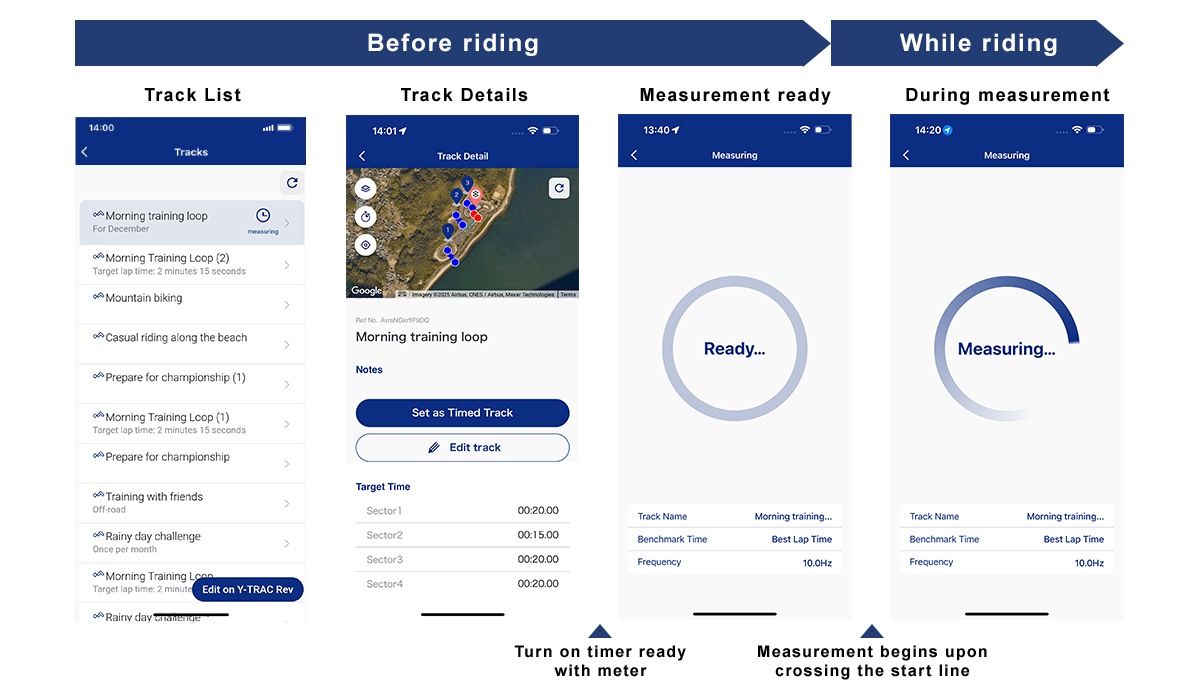
Y-Connect Track list
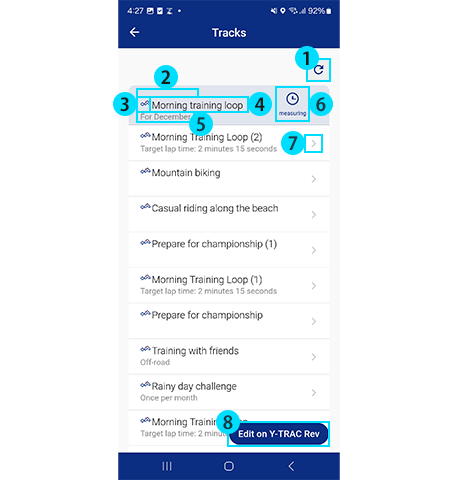
| 1 | Refresh Tracks | Refresh the timed track details, including changes on Y-TRAC Rev. |
|---|---|---|
| 2 | Original User's Nickname | Displays the nickname of the user who shared the track. |
| 3 | Track Type Icon | Displays the icon for the related track type (track or rally). |
| 4 | Track Name | Displays the track name. |
| 5 | Ref No | Calculates and displays the reference number based on the preset line information. |
| 6 | Track icons for measurment | Displaying the measuring icon on a track that has already been set as a timed track. |
| 7 | Track Details | Transition to the track details screen. |
| 8 | Edit on Y-TRAC Rev | Launch the Y-TRAC Rev application. |
Y-Connect Track details
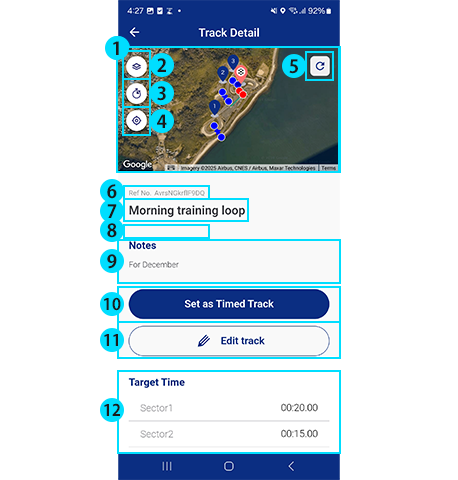
| 1 | Map |
The map is initially displayed at the position and scale where all lines are visible.
The display position can be changeed by swiping, and the map can be zoomed in/out by pinching(In/Out). |
|---|---|---|
| 2 | Map switching | Opens a menu to switch the map display type and switches the map display by the type selected in the menu. |
| 3 | Time display switching | Switch on/off the target time display on the map. |
| 4 | Current Location | Show your current location. |
| 5 | Refresh Tracks | Refresh the timed track details, including changes on Y-TRAC Rev. |
| 6 | Ref No | Calculates and displays the reference number based on the preset line information. |
| 7 | Track Name | Displays the track name. |
| 8 | Original User's Nickname | Displays the nickname of the user who shared the track. |
| 9 | Notes | Register track detail notes. |
| 10 | Track setting button for measurment | Tap to set the currently displayed track as the track for measurment. |
| 11 | Track edit button | Tap to launch the Y-TRAC Rev app. |
| 12 | Target Time | Lists the meter display target times set for the track being displayed. |
Vehicle Meter Settings for Timed Tracks


Vehicle Meter Settings
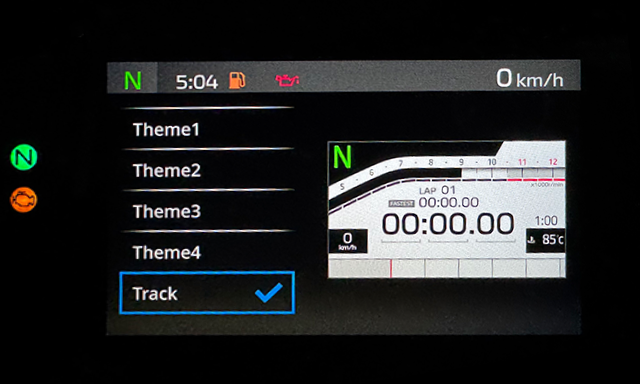
1. Set to Track Mode
Select “Track” from the theme menu to put the vehicle in track mode.
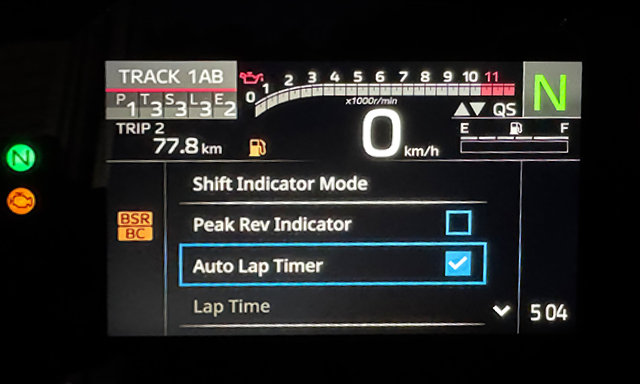
2. Turn on the Auto Lap Timer
Check off the "Auto Lap Timer" option under Track Settings.
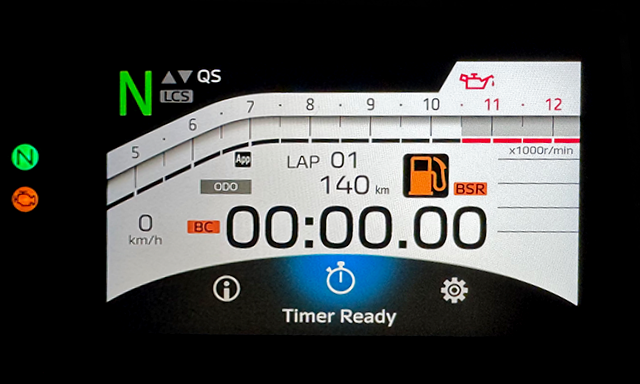
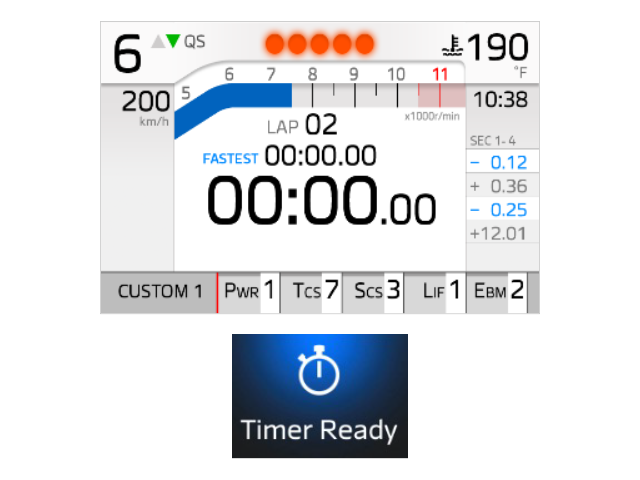
3. Select “Timer Ready”
Select "Timer Ready" from the menu to put the vehicle on standby.
How Rides are Timed

Measuring begins in Y-Connect when you pass the start line set in the track settings
When the start line set in the track information is crossed, Y-Connect's timer will begin, and timer data will be shared with Y-TRAC based on GPS information. The time gap between the sector time and the set target time / best sector time is displayed on the meter screen each time a sector is passed. For circuits, the lap time is displayed each time the start / finish line is crossed.

How to Finish Timing a Track from the Vehicle Meter
To finish timing a track, select “Timer Off” from the meter menu or turn the vehicle’s engine off.
Devices That Collect GPS Data
GPS data is obtained from the built-in GPS on the smartphone connected to Y-Connect or an external GPS device. You can achieve more accurate lap time tracking using an external GPS.
Smartphones
Information is retrieved at approximately 1-second intervals
External GPS
Information is retrieved at intervals of 0.1 to 0.3 seconds

